Rationale
Research
Searching for games with advanced NPCs, I realized there are few resources and studies on game AI. Therefore, the research will be gathered from a select few sources, supplemented by my own investigations if possible.
Advanced NPC Case Studies
F.E.A.R
While there are few studies of complex NPCs, one name consistently emerges: F.E.A.R. Despite being a game from 2005, it is still heralded as having one of the most advanced and intelligent AI systems compared to modern games.
The reason F.E.A.R’s AI seems so advanced is due to a technique known as automated planning, a method revolutionized for games by Monolith Productions. Automated planning is inspired by a system called STRIPS from 1971, originally used to program robots. In the game, this means the enemies can accurately plan out actions based on the preconditions required to perform said action and the effect that action will have. If the conditions are met, the enemy will perform the action, complete with an animation to demonstrate it. Each enemy has a defined goal it wants to achieve, and using a series of different actions (with their own conditions and effects), it can decide which works best for its goal. To ensure high-quality AI on par with the best examples in gaming, I will need to explore systems such as this, understanding how to create and utilize them.
Another advanced technique used to plan how actions are performed together is known as “Task Networking.” This allows for multiple actions to be grouped together, creating quicker, more fluid pathways to certain goals. This can be compared to decomposition, breaking bigger tasks into a series of smaller tasks to make them more manageable for the AI. In collaboration with automated planning, this should ensure a strong project, allowing actions to flow seamlessly. This approach will be considered as a potential method for my project.
Although the enemies within F.E.A.R give the impression that they can interact with each other, performing combat techniques and movements as a group, they are actually unable to detect each other. Instead, they have goals that coincide with each other, and when actions are carried out to achieve these similar goals, it simply looks like they are collaborating. To further this impression of collaboration, voice lines are yelled, explaining these collaborative actions. Collaboration is an important aesthetic for these NPCs, as they are soldiers working within a unit. This enhances the realism, increasing the player’s immersion within the game world.
Touching more on the voice lines in F.E.A.R, each one is accurate to exactly what is happening at a given time, providing clues about what the enemies are doing or about to do. While this isn’t specific to AI, as the enemies don’t actually hear or respond to these, they still greatly help with immersion. This separates F.E.A.R’s AI from most other games, as the voice lines accurately reflect what is currently happening, further enhancing the realism of the NPCs.
Examining the specific mechanics the NPCs use to allow for this realism, the AI possesses vast tactical knowledge. For instance, they flank players hiding behind cover to flush them out for a better shot. This can be interpreted as a form of confidence within the AI; the NPC felt unconfident with its current odds and decided to increase them by creating this line of sight. If this flank was unsuccessful or the player stayed in this location for too long, they might throw a grenade. This again can be seen as a form of confidence; the NPC saw it was failing with one plan and changed it to a better one. These displays of confidence, while simulated, still further the advanced nature of these NPCs. Most interestingly, they will take advantage of other soldiers distracting the player, using this as an opportunity to sneak up from behind. The AI’s ability to assess a situation and take advantage of specific variables shows it possesses some form of critical decision-making, making it more akin to a real human being with a brain. The AI can be thought of as having two states: offensive and defensive. The offensive aspects have been covered; now, let's examine the defensive mannerisms.
In defensive situations, enemies with low HP retreat, either running from the player or finding cover. If enemy soldiers are dwindling in numbers or trapped, they may choose to hide behind cover, waiting for the player to present themselves. These are the most blatant shows of confidence; if the AI is more vulnerable and weak, it will try to avoid combat if possible. To further this idea of being alone, the AI stops speaking, almost adding emotion to them—displaying fear—without actually implementing this. If the enemy lacks objects to hide behind, it can interact with certain objects, pushing them over to act as cover. Complex mechanics like this make AI feel unique and stand out. It possesses the ability to critically view the game world and interact with it in believable ways to further its own tasks, convincing the player of their reality.
Much like real life, the AI doesn’t just rely on specifically seeing the player. For instance, if the player flashes their flashlight, this would also clue the AI to the player's location. Building the senses of the AI is imperative to the responsiveness of my NPCs. While F.E.A.R doesn’t incorporate other senses such as hearing, this could be another way to further this system. An AI with multiple senses and multiple ways to interact with a given space immensely helps with the illusion of realism. Every method of fleshing out an NPC is a sure way to enhance this illusion.
Sources Referenced
F.E.A.R NPC Behaviour Demonstration
Alien: Isolation
Looking at Alien: Isolation, there are many tricks and traits that present the AI as intelligent and lifelike despite it being mere code. While this is not strictly a combat game featuring NPCs similar to what I intend to implement, many of these mechanics are still useful for my own implementation.
To give the xenomorph the illusion of learning, many actions within its extensive behaviour tree start locked and only become enabled when certain conditions are met. For example, if the xenomorph sees a player hiding in a closet, it will learn to check closets on future occasions. The NPC's ability to learn and grow during runtime can be compared to real creatures with the capacity to think. I could use a similar system, having my agents check behind cover if they are shot at from someone behind one.
Another way the AI mimics realistic traits is through doubting itself, often retracing steps and double-checking to ensure an area is clear of players. To enhance my NPCs' realism in a combat situation, I can incorporate a similar investigation system featuring these mechanics. Adding doubt gives the NPC a personality, with human traits as simple as doubting furthering the realism.
When programming pathfinding for NPCs, systems typically find the most optimal route. However, this is not very realistic. Alien: Isolation addresses this by programming the xenomorph to make mistakes and take longer paths than necessary. This is another excellent example of a mechanic I can use to influence my project. Most game AIs come pre-packaged with extensive knowledge of the space they occupy and all variables they could possibly interact with. The xenomorph making mistakes helps employ realism, one small trait at a time.
Regarding the senses of the xenomorph, the alien relies primarily on hearing. Whether it be footsteps, gunshots, or devices, each produces different levels of sound, all of which can be detected by the alien, thereby giving away the player's location. Making NPC sensors multidimensional furthers their realism, making them more akin to real life.
Sources Referenced
Left 4 Dead
Left 4 Dead, while not renowned for its enemy AI, still features an advanced form of AI designed to challenge the player. This is known as the Director AI, which has knowledge of player actions and the surrounding environment. With this information, it can increase difficulty when the players are relaxed and decrease it when they are stressed for a prolonged period. Although this mechanism is not specifically realistic, it significantly enhances the game's enjoyment and replay value. This feature likely will not be present in my project, but understanding it may benefit future endeavors.
Sources Referenced
Left 4 Dead NPC Analysis
Half Life
Half-Life is often regarded as one of the best first-person shooters of all time, primarily due to its immersive storytelling. However, this is not the only area in which the game excels; it is also a notable example of advanced AI created through Finite State Machines (FSMs).
Examining the AI of Half-Life reveals why it was ground-breaking at the time. Each enemy is assigned a monster class dictating their role, such as a friendly scientist, hostile soldier, or alien. Within these classes, each enemy has a series of states representing their current action, and conditions represent the information available to the enemies. The AI is assigned tasks that coincide with states within an FSM, determining what the AI will do. Half-Life's advancement lies in its over 80 tasks, allowing the AI to make more realistic decisions.
To prevent the AI from solely reacting to stimuli, they are assigned schedules—groups of tasks that enable more intelligent behaviour. There are around 40 schedules in Half-Life. One potential drawback is that only one task or schedule can be active at a time. For example, if the enemy needs to run from gunfire, they will first stop shooting and then run. To allow for more complex actions, multiple schedules may be grouped together, but this can become confusing. This is why goals were implemented. Although there are only five goals, they play a crucial role. Goals determine what happens after a schedule is completed, often providing another schedule to the AI. Typically, a schedule is completed when all tasks within it are finished. However, if a schedule is marked as obsolete, it may be prematurely completed, allowing the AI to move on to more relevant objectives.
Half-Life's AI is advanced and responsive due to its unique senses, such as sight, smell, and hearing. Sight, the primary sense, is represented by vision cones assigned to each NPC. Hearing is common among NPCs, while smell is more unique but functions similarly. Both senses work by playing a sound effect or emitting an invisible, inaudible effect detected by those close enough. Adding different senses to NPCs is an effective way to employ realism, giving them traits more akin to humans.
Half-Life uses binary to store 32 unique conditions, ensuring compactness. However, this complexity is beyond the scope of my current implementation capabilities.
Sources Referenced
Half Life NPC Analysis
Halo 2
The AI of Halo is one of the most renowned examples of behaviour trees, as it was among the first mainstream implementations. However, its complexity and intelligent planning are demonstrated not only through programming but also through the character models. By examining these models, we can infer how the NPCs will act.

Examining this enemy, we can infer that it may be skittish and awkward. Its slouched stance and small size convey this impression to the player. This is further emphasized by the fact that the player is 1.54 times larger than the creature.

From this enemy's larger, bulkier nature and confident upright stance, we can infer that it is more aggressive and skilled. It towers over the player, instilling fear and caution due to its power and danger.
The AI in Halo 2 requires substantial information to make informed decisions. For instance, the player's location influences where the enemy will go. Based on the information available, parts of the behaviour tree may open up or be locked off, narrowing down what the enemy can do at a given time.

Typical Halo 2 behaviour tree, demonstrating their ease to read and program.
While conditions are crucial for decision-making, multiple truths may exist simultaneously, but the enemy can only perform one action at a time. To address this, a priority system is used, ranking certain actions above others so the AI always knows what to do. This approach should work perfectly for my NPC, as a priority system will help guide the NPC towards more realistic actions. One limitation of this system is that it does not allow for long-term planning and instead forces the AI to act on what is best at the moment. This should not be too large of an issue as long as I can break up large tasks into smaller tasks.
A specific mechanic that adds complexity to the AI is achieved through stimulus behaviours, which create an impulse in the NPC, compelling it to perform specific actions. Examples include entering a vehicle if the player is in one, or low-ranking enemies fleeing if their commanding officer is killed. To ensure the AI does not repeat these actions excessively, a delay is used, preventing the AI from exploiting certain stimuli and making them more realistic and enjoyable. While certain actions, such as throwing grenades, should not be repeated to ensure fair and fun gameplay, it may be more realistic and advantageous from a tactical perspective.
Sources Referenced
Halo 2 NPC Analysis
Ways to Program AI
Finite State Machines
I found it appropriate to start with the simplest and original method: Finite State Machines (FSMs).
Whilst researching Half Life I gained a thorough understanding of FSMs. Broadly speaking, FSMs are a method of programming AI, more linear than behaviour trees and used to follow simple sequential logic. In games, they are composed of a series of states representing actions or stimuli, such as NPCs. The AI transitions from state to state based on events. If only one state can be transitioned to at a given time, it is known as a Deterministic Finite State Machine. If multiple states are possible, it is called a Non-Deterministic Finite State Machine. FSMs allow AI to respond to multiple stimuli and a changing environment, making them the preferred method for AI programming in the past. However, as more advanced methods like behaviour trees were developed, FSMs decreased in popularity. This does not render them obsolete; depending on the AI's scale and complexity, FSMs can still be a strong contender for AI implementation. The main drawbacks of FSMs are their programming difficulty compared to more intuitive behaviour trees and the complexity they introduce as projects scale. The more possibilities the AI must handle, the more unique transitions are necessary, increasing the difficulty of reading and debugging the AI.
One solution to alleviate this complexity is Hierarchical Finite State Machines (HFSMs), which group states together, allowing transitions to move in specific ways—essentially building a state machine that transitions between more modular state machines.
Using a series of tutorials, I am exploring various methods for programming AI. I consider these tutorials reliable, as the author is an accredited university lecturer and a source for much of my research into advanced NPC examples.
Beginning with the first tutorial, it covers the creation of states that the NPC will adhere to, including whether the state is inactive, active, completed, or terminated.

From this point, I moved on to the second tutorial, which covered the creation of an actual NPC state. It began with a simple idle state. Although the NPC cannot interact with it currently (as the FSM has not been fully implemented), the state itself is established.
This tutorial proved particularly beneficial. I found the first tutorial somewhat confusing and was concerned about the actual creation of the states. However, this tutorial explained the process clearly, enabling me to implement my own custom states effectively.

With a state created, it was time to develop the FSM.
This was explored in the third tutorial. This tutorial provided a solid understanding of FSMs, demonstrating how they can recognise states and perform actions within them.


When it came to following the fourth and final tutorial, I encountered an issue.
The publisher referenced another state from a previous tutorial of his. As it would be too time-consuming to locate this tutorial and manually type out the state, I opted to watch the tutorial and understand the concepts as best as I could.
While the tutorial was lengthy, most of the time was dedicated to explaining the implementation of the patrol state. My primary interest was in state transitioning, which was relatively simple. This involved using the “nextState” line followed by the name of the state to transition to.
An unrelated but valuable lesson from the tutorial series was the importance of debug statements. The scripts were filled with these to ensure that any issues could be easily identified and resolved. Since AI creation is new to me, I will include as many debug statements as reasonably possible in my scripts.
This tutorial series effectively covered the creation of an FSM. Although some parts were confusing, I believe the series provided a strong enough foundation for me to implement my own FSM for use in my project.
Behaviour Trees
Behaviour trees are perhaps the most common method for programming AI, and they can be divided into two groups: code-based and visual.
Examining behaviour trees as a whole, these provide an alternative way to program AI compared to Finite State Machines. The main advantage of using behaviour trees lies in their easier-to-understand and readable format. This also allows for quicker programming and debugging.

The sequence node at the top dictates that all nodes present underneath are executed in order from left to right. Selector nodes indicate that certain actions are executed only if specific conditions are met. The nodes that terminate branches are known as leaf nodes, indicating that an action is being performed. If the tree is followed through entirely, it can loop, or a separate tree can begin to be explored.
Coding
Using a tutorial, I aim to gain an understanding for coding my own NPCs.
The tutorial began with an explanation of behaviour trees and their uses. While some of this information was helpful, I had already covered most of it in previous research, allowing me to skip over this section and save time.
Behaviour trees require logic to function. Therefore, before I could create the NPC behaviour tree, I needed to establish this underlying logic.
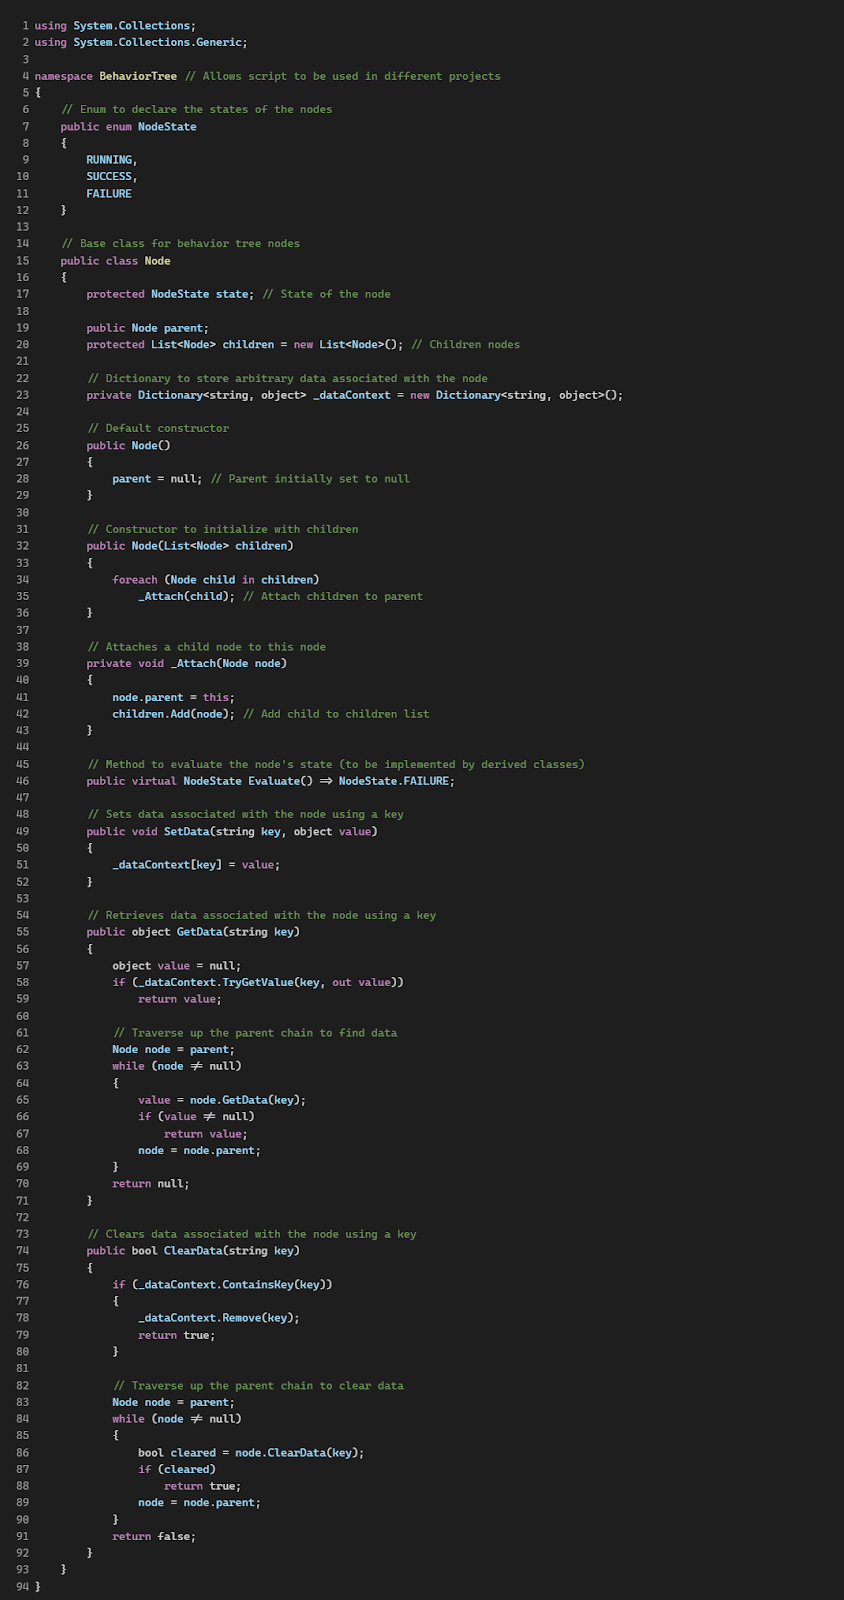


These foundational elements will be used to aid in the creation of all behaviour trees within a given project. While understanding this initial logic is challenging, I feel I have a sufficient base to apply it in my own project.
From here, an actual behaviour tree for a guard was created. This guard patrols three points and, when close enough to an enemy, goes to attack. Once the enemy is killed, the guard returns to patrolling.
To ensure my research remains specific to my project, I have only commented on lines related specifically to the behaviour tree. I have also excluded the enemy script as it is not relevant.


Initially, I found the tutorial quite confusing and was concerned about understanding its content. However, as I explored what each line specifically meant while adding comments, it began to make sense. The logic that enabled the behaviour tree to function was relatively simple and easy to follow.
This tutorial effectively covered everything I needed to know about coding behaviour trees. I now have a firm understanding of how to implement them myself, making behaviour trees a strong contender for how I will program the AI for this project.
Sources Referenced
Coding Behaviour Trees Tutorial
Visual Scripting
Exploring visual scripting options for Unity reveals a significant issue: all available options are external tools, most of which are paid. Generally, higher quality tools come with higher costs. The most popular visual scripting tool, "Behaviour Designer - Behaviour Trees for Everyone," costs €89.82. While this price is affordable, it makes other methods of programming AI more appealing.
Examining "Behaviour Designer - Behaviour Trees for Everyone" more closely, it offers an intuitive visual interface for programming. Compared to the coding alternative for behaviour trees, it is easier to read, debug, and saves time.

The tool also includes various pre-built systems, such as object seeking and sight systems, which are particularly beneficial for NPC creation. They alleviate much of the complexity associated with developing these systems independently, thereby saving considerable time. However, this convenience presents a challenge: if all the work is automated, there is limited opportunity for learning, rendering the project less valuable in terms of programming skill development.
One of the notable drawbacks of visual scripting, particularly for me, is my preference for coding. Since coding is the skill I aim to develop personally, utilising visual scripting may not be suitable.
The Decision
After careful consideration of each prominent option for NPC creation, I have reached a decision. While Finite State Machines initially appeared viable, this was solely due to a lack of exploration into other options. I perceived their complexity as a default choice, assuming there were no simpler alternatives. However, upon researching behaviour trees, even the coding option proved far more understandable and manageable. The logic behind it resonated with me.
It should be noted that visual scripting for behaviour trees is the easiest option, yet as discussed earlier, ease of use alone does not necessarily make it the most favourable choice. Additionally, its cost places it slightly below coding behaviour trees. Nonetheless, the research clearly demonstrates why behaviour trees have surpassed FSMs as the preferred method for programming AI.
Therefore, I have decided to proceed with coding behaviour trees as the chosen method for creating my game NPCs.
Pathfinding Exploration
Researching fundamental mechanics, I began with the simplest form of interaction: NPC movement, specifically pathfinding. Before initiating this project, when I first conceptualised the idea of what I wanted to explore, I briefly examined pathfinding. While I believed my initial overview covered the essentials, it turned out not to be the case.
The green inner square represents the navmesh, which indicates where the agent can navigate. The green cylinder represents the agent (NPC), and the red line protruding from it indicates its destination towards the red marker.

While my initial understanding covered the basics of creating a navmesh, it was limited to a singular plane. The agents created to traverse this navmesh were only capable of moving along that single plane. However, for more complex movement, such as navigating steps and slopes, depth would be required.
By following the tutorials in the series I have gained a comprehensive understanding of all the necessary components for my implementation, along with some additional features.

Examining the "Step Height" and "Max Slope," these parameters define the maximum height NPCs can jump up and the maximum degree of slope they can traverse, respectively.
While the tutorial covered how to rebake a navmesh during runtime, it failed to specify the need for downloading external tools. Consequently, when I attempted to test this feature, it did not work as expected.
However, I found another tutorial that explicitly mentioned the necessity of downloading this external tool. As a result, I now understand how to rebake navmeshes during runtime.
These tutorials were not without their flaws. They were designed for an older version of Unity (2017.3), which led to changes or removals of many tools. This made following the tutorials somewhat challenging. However, with the help of comments and my own perseverance, I managed to overcome these obstacles. One significant issue I encountered was with the behaviour of the agent. They often slid around corners, overshooting their goals. Initially perplexed by this, I attempted to adjust various speed variables of the agent, such as speed, angular speed, acceleration, and stopping distance. Unfortunately, none of these adjustments resolved the issue.
As a last resort, I turned to the Unity discussion boards, where I found the solution. Simply increasing the acceleration, significantly more than I initially attempted, from 8 to 100, solved the problem, and the NPC's movement is now functioning perfectly.
Despite their shortcomings, these tutorials proved highly beneficial, providing me with a solid understanding of pathfinding within Unity.
Planning
My NPCs
Having conducted thorough research into advanced NPC examples, I am now ready to put these ideas together to create my own advanced NPCs.
Before adding advanced mechanics, it is essential to establish a solid foundation. This will start with implementing simple pathfinding. Patrol points will be created to test this mechanic effectively. The enemy NPC will navigate to each point in sequence before looping back to the start. Utilising navmeshes will enable the NPC to adapt its route if obstacles are encountered while still reaching the intended destination.
After setting up pathfinding, I will develop a vision system for the NPC, represented as a cone. This vision cone will allow the NPC to detect the player and initiate a chase once the player is within sight. Initially, this vision system will be basic but will be expanded upon as more mechanics are integrated.
To enhance this system, I will incorporate a "last known position" feature. This will enable NPCs to lose sight of the player and investigate their last known location. During this investigation, the NPC will scan the area, resuming the chase if the player is spotted again. If the player is not found, the NPC will return to its patrol route.
These foundational mechanics will facilitate basic investigation and pathfinding for the NPCs. To develop more combat-related features, NPCs will need to decide whether to advance towards the player, retreat, or hold their position. This decision will be based on various factors, such as whether the player is within shooting range, the availability of cover, and who holds the high ground.
The NPCs will also need to detect objects that can serve as viable cover using their vision cone. They will evaluate the effectiveness of the cover and its proximity to the player. Once in cover, the NPC will determine the optimal time to attack, potentially when the player is not shooting. If an NPC's health is low, it will seek nearby cover or retreat if none is available.
In terms of offensive tactics, NPCs may attempt to flank the player if they remain behind cover for too long. Detecting whether the player has stayed behind cover for an extended period may be challenging. Implementing a trigger that encompasses the entire rear of the cover could address this issue. If flanking is unsuccessful, the NPC could throw a grenade to flush out the player. To prevent grenade spamming, a delay will be necessary.
To further enhance the NPC's sensory capabilities, hearing will be implemented. Actions such as shooting and walking will emit triggers that the NPC can detect and investigate.
These mechanics constitute the essential features required to achieve my goal of creating advanced AI for my project. Assuming all these mechanics are successfully implemented, I will have met my objectives. If additional time permits, I will pursue stretch objectives, such as allowing NPCs to create cover by pushing over certain objects or fleeing if a commanding NPC is killed.
SWOT Analysis

Present above is my SWOT analysis, this was used to outline my Strengths, Weaknesses, Opportunities and Threats.
A SWOT Analysis proved an effective way to visualise all of these, ensuring I could stay on top of them, taking opportunities if they arose. Avoiding for or planning for threats should they have arisen. As well as strengthening my weaknesses with my research.
My strengths were largely avoided as there was little to do here, but noting helped to ensure I didn't waste time researching aspects.
Moodboard

My moodboard proved quite a challenge to create, trying to portray was a challenge like no other. One I eventually got around by using images accompanied with a description.
Whilst my moodboard didn't aid me too much, as it was completed after a lot of my research, when I already had or had an idea of what I wanted to research. It will aid viewers of my website, visualising what my project is about.
Original Gantt Chart

This is my original Gantt Chart, the timeline I followed throughout the majority of my project. Used to ensure I remained on track, not falling behind and making efforts to catch-up if I was.
Updated Gantt Chart

Here is my updated Gantt chart, updated to better fit my time lost during a week of practical. I am proud of the flexibility I demonstrated here, creating this new timeline ensured I remained on track and completed what I could in my remaining time left with the project.